Your Privacy Versus The Government

Data SecurityWith the proliferation of mobile devices around the world, data security on these devices is getting truly serious attention. Apple, Google, Microsoft, and others are automatically encrypting data on these devices. This encryption is getting so strong that it has intelligence and law enforcement agencies very concerned. They’re worried they won’t be able to get into these devices during investigations.

What Is Encryption?

I won’t be getting too technical, but here is the concept: The data on your mobile phone gets randomly scrambled based on a complex key. That key allows your phone’s operating system (Android, iOS, Windows Mobile) to descramble and use the data. If you legitimately access the phone with a passcode or biometric check (like fingerprint reader), then you can access data on the phone. If you don’t have the passcode, your truly locked out. Even if you disassemble the phone and remove the storage element, all you’ll be able to see is jumbled, meaningless numbers, letters, and symbols. Without the encryption key, it could take a supercomputer thousands of years to discover the key that decrypts the data.

Governments Want a Back Door

Law enforcement and intelligence agencies want a special key to a “back door” to access data on phones. Sounds reasonable, but there are ramifications. If there’s a known back door, then malicious hackers have a target. These people will find it. That’s what they do. Also there’s the obvious government intrusion potential.

It’s Not A Good Idea

For the greater good, a government back door just can’t be a good idea. While it would make investigations much easier, the potential for abuse and exploitation is just too great. It’s not whether abuse will occur but when. When pressed, I think most investigators will admit that other tactics will discover the evidence they need. And there’s always the possibility a suspect can be convinced to surrender a passcode to access a mobile device’s data.

If a universal back door exists and is exploited, it puts a huge number of people at extreme risk for identity theft and more. A virtual skeleton key to access any device is so profoundly dangerous to the well being of so many people, it’s ludicrous to even consider.

Anyone who argues otherwise is shortsighted or untrustworthy.

Learn more: Daily Dot9to5mac

Back Up Apple Health Data (and Other Settings)

iPhone Backup

iPhone Backup

If you’re backing up your iPhone to iCloud Backup, then those backups are encrypted and include the Health app’s data.

If you’re backing up your iPhone to iTunes on your computer and you are not encrypting that backup, then your Health app data is not being backed up. And neither are your saved passwords, Wi-Fi settings, or Web site history.

While Apple doesn’t make this clear enough in my opinion, the fix is fairly simple.

  1. Connect your iPhone to your computer
  2. Start iTunes if it isn’t running already.
  3. Select your iPhone in the iTunes interface.
  4. In the Summary panel for that iPhone, located the Backups section.
  5. Ensure that This Computer is selected.
  6. Click to place a checkmark in Encrypt iPhone Backup.
  7. Click Sync to initiate the backup.

IMPORTANT: During the sync process, you will be prompted for a password for your encrypted backup. Do not forget this password. You cannot recover the backup without the password.

Now check that your backup completed successfully.

  1. Click the Edit pull-down menu.
  2. Click Preferences…
  3. Click the Devices tab.
  4. Look for the entry with your iPhone’s name. Check that the date coincides with the most recent backup. And ensure that a lock icon is present on that line entry. The lock means that backup is encrypted.

LastPass is Still Safe

LastPass logos on multiple devices

LastPass logos on multiple devicesAccording to security expert Steve Gibson, LastPass is still safe … after you take one action. And a further testament: Gibson still uses the service himself.

What action? Change your master LastPass password. And two-factor authentication does not exclude your need to do this. Two-factor authentication is still important and prudent, but it won’t protect you from this potential breach.

And about this breach. Apparently, LastPass representatives have only detected anomolous network traffic on a network when they did not expect it. Reportedly, they detected activity overnight on one of their networks when no employees were present. There is no confirmation that data was actually breached or stolen. LastPass is prescribing changing LastPass passwords out of prudence.

Oh, and make sure you have a complex and random password that is NOT stored in LastPass or used at any other site. Take this advice seriously! Be sure to record this password and store it in a truly safe place. And it would be a good idea to not record this password 100% accurately. Make a mental note of your modification. When your recorded password doesn’t work, then you’ll remember you modification. Re-enter this password and you’ll be in.

Security is not always convenient, but a breach or identity theft is a way bigger headache.

Apple’s Touch ID is Finally Relevant

Apple Touch IDWith iOS 8, Apple is finally allowing third-party app developers to leverage Touch ID. This allows those apps to securely access the identity information stored in Touch ID-enabled devices. Now users of those apps can authenticate with their fingertips to gain access to information within those apps.

Touch ID first appeared in the iPhone 5s and iOS 7, but Apple chose to keep its use limited to securely accessing the phone itself. A year later, iOS 8 is much more open. And developers are free to add this powerful technology in their apps.

Now, password management apps like LastPass and 1Password can ensure that you are really you. Additionally, Apple has allowed extensions into Safari which allows these apps to more easily enter usernames and passwords automatically.

Other apps are starting to implement Touch ID for enhanced security options. Microsoft’s OneDrive was recently updated to support PIN access. Once enabled, the file storage and sharing app allows you to use Touch ID to bypass entering the PIN.

Of course, Apple Pay will use Touch ID with the new iPhone 6 phones. And that service offering might just be the killer feature of this generation’s iPhone. It facilitates credit card transactions without sharing card numbers or personally identifiable information.

Who said convenience must take a backseat to security? This sort of thoughtful approach is how technology can actually simplify life instead of just adding something else to it.


How It Works: Getting Your Email on a Wireless Device

Internet Connections

Recently, I’ve had to explain this concept to non-technical technology users. For techies, the concept is simple and obvious. For non-techies, the concept is muddled and confusing. So if you’re a techie, then consider sharing a link to this post with the non-techies you love.

Internet Connections

Understanding the Systems Involved

The most obvious is the wireless computer or wireless device. Next, there is the wireless router. Finally, there is the email service.

The Wireless Computer

For simplicity’s sake, I’ll focus on a wireless laptop, but the concept is very similar for mobile devices like smartphones and tablets.

The laptop will have a user account on it. The account might be (and should be) password-protected. Once you’ve logged into the computer, you can use applications on it to write a document or access the Web or email.

The Wireless Router (WiFi)

The term “WiFi” is thrown around a lot these days, and it means wireless fidelity. In simple terms, it means the ability to have a network connection without a wired connection. In the old days, having an Internet-connected laptop in the living room meant jumping rope with a network cable. Do-able, but not fun.

The wireless router might have (and really, really should have) a password (aka, passphrase) to allow a device to connect to its wireless network. Most of the time, the wireless laptop will remember the connection after connecting previously. This is a convenience feature, but it’s important to realize that the process occurs every time the computer wakes up and accesses services on the Internet.

A couple of related facts about the wireless router: First, the router probably has ports (or connections) to allow wired devices (like a desktop computer) to connect to the router using wired technology. These devices don’t use WiFi. Second, the router may also be combined modem and router device. This just means what used to take two devices, now just takes one. Modem technology simply translates the signals that go through a cable or phone connection into standard Internet network signals that computers can understand. This is not a critical concept to understand, but now you understand a bit more when techies start throwing these terms around.

Email Service

You’ve logged into your laptop, and it has logged into your wireless network. Now you can access the services available on the Internet. Most people like to check their email accounts. Email services are accounts that require their own username and password. Just like your computer. Just like your wireless router (even if it happens in the background for your convenience). You need to log into email with a separate and different username and password. Username and password is sometimes call your login credentials. For the sake of security, your email login for email really should be different than that used for your computer or wireless network.

Besides email accounts, you may also have accounts with Amazon, your bank, or perhaps a membership organization. The concept is basically the same.

Conclusion

This blog post is meant to explain basic concepts. I can’t provide meaningful steps to regain access to an account with a forgotten password. My hope is that understanding the separate – but interplaying – systems will help you isolate where the problem actually lies.

Security Concern: Pictures Worth 1,000 Words … Including Your Location

Location Services and Your Camera

Location Services and Your Camera

Taking pictures on your mobile phone is simple and something you take for granted most of the time. And if you load them on your computer at home, some photo management applications (like Photoshop Elements and iPhoto) can even plot on a map where you took your pictures. This is nifty for seeing all your overseas vacation pictures grouped separately on that map. It’s fun.

But it might not be fun all the time. When you upload these photos to sharing services, that location information goes with those pictures. This includes Facebook. Depending on the GPS in your smartphone, precise location information might be included.

Here is the worst case scenario: A predator can learn family names using social media channels. Using picture EXIF data, that criminal can deduce locations of child care facilities, friends’ homes, and even room location in your home. Anywhere you’ve snapped a picture and then shared it.

How? Every picture is actually a computer file. Along with the information required to generate the image, that file also stores technical information. This usually includes the make of the camera, the settings of that camera, the dimensions of the image, date taken, and (you guessed it!) where it was taken (usually latitude and longitude). Collectively, this data is called Exchangeable Image Format (EXIF) info.

If this bothers you, you can simply turn off Location Services on your smartphone.

For iPhones with iOS 6, do the following:

  1. From the Home Screen, tap Settings.
  2. Tap Privacy.
  3. Tap Location Services.
  4. Find Camera in the list and tap the toggle to Off.

For other devices, I did some research and found that Amazon has a great resource for doing this on iPhone with iOS 5, Android, Kindle Fire, and Windows Phone.

Turning Off Location Information on Specific Devices [Amazon]

Maintain Your Photo Album When You Use Multiple Devices

Numerous Tiled Images

Numerous Tiled Images

Many of us have a camera in our smartphones. We also have point-and-shoot cameras or DSLR cameras for high-resolution shots with optical zoom. Digital pictures are great, but collecting them into one location can be a challenge.

Goal: Create an annual photo album

My family collects all our good shots into an annual photo album, which is actually a folder on a computer hard drive that gets backed up regularly.

We have a Panasonic Lumix camera that serves us very well. Getting the pictures off its SD card, reviewing them, deleting the turkeys, and saving them to the album is a fairly easy process.

The challenge is getting the album-worthy shots off our iPhones. Along with capturing priceless moments, we take odd pictures of products while we’re shopping to keep as reminders or to share with each other later. We save the funniest Facebook pictures to our camera rolls. We’re not interested in keeping these for posterity. More on this in a moment.

Several apps are available for iOS, Android, and Windows Phone that will automatically upload your camera roll to cloud services. Some are better than others, of course. DropBox’s app includes this functionality, but it can only upload when it’s running. And when the iPhone auto locks, the upload process is suspended. Amazon offers Cloud Drive Photos for Android and for iOS. It is similar to DropBox, but it prevents auto lock during uploads (Nice!). The problem with these cloud backup services is that they upload everything, including the unimportant pictures like the one’s I mentioned a moment ago.

A Thoughtful Approach

I put some thought into this and created a strategy that I hope works for us … and maybe for you, too.

I decided to create a cloud-based folder structure for the current year’s photo album, and I created it in Microsoft’s SkyDrive service. The iOS app allows me to selectively upload photos from my camera roll. And just for kicks, I created a folder for my favorite funny images from Facebook, too.

With this approach, my wife can also upload the best pictures she takes from her phone. Once the photos are uploaded, they are synchronized to my desktop. So I have the photo album locally and backed up in the cloud. Our photos are collected in one place, and they’re safe without too much effort.

I’m hoping this strategy works well for us. Hopefully, you can adopt it or adapt it to your own needs. Share your own insights or strategies in the Comments section.

It’s Time to Get Used to Two-Factor Authentication

Padlock


Malicious hackers are targeting usernames and passwords with growing success. Hijacked email accounts are common. If it hasn’t happened to you, you know a friend who has been affected. High-profile Twitter accounts are hijacked regularly. There’s a way to protect yourself, and it will truly be a pain in the butt.

It’s two-factor (or two-step) authentication. And the three top Web-based email services from Microsoft, Google, and Yahoo! have each implemented this type of heightened security, and it’s a feature you should seriously consider switching on.  Other popular services are adding these security measures, as well. So seek it out for all your online accounts.

The benefit is clear: To gain access to an account, you must have the password and a code the service makes available to you when you need it. So it’s something you know (the password), and something you have (a smartphone that receives the code). The chances of a malicious hacker having both of these things is very low.

The pain is also clear: You’re going to need to prove you’re you fairly regularly. Especially the first time you log in from a new computer or device.

I like to focus Ferocious Tech on ways to simplify living with your technology. This article goes against that grain, but this topic is vitally important. It would be much easier to simply walk through the front door of your home, but you have a lock on the door that sometimes makes walking through it more difficult for the sake of security. This is absolutely no different.

Kinds of Second-Step Authentication

On Demand Codes. These are multi-character codes that are sent to your phone via SMS text or a second, validated email address. When you attempt to log in from a device the service does not recognize, the code is automatically sent. So if you’re a hacker, you’re dead in the water. If you’re you, then you have to get the code and enter it to gain access. Just like the key to your front door.

QR Code
Example of a QR Code

Authenticator App. Some services allow you to use an Authentication app on your smartphone that generates valid codes. This allows you to get a code when your smartphone does not have Internet access. After you install the app, you step through a process to pair the app with the service by scanning a QR code. When you attempt to log in from a device the service doesn’t recognize, you are prompted to enter the authentication code from the app. If you’re a hacker without the smartphone that paired with the service, you’re dead in the water again. If you’re you, you take out your phone, open the Authentication app, and enter the code for that account. Again, just like the key to your front door.

Personally, I use Google’s Authenticator app on my iPhone to access both Google and Microsoft email accounts. It works just fine.

App-Specific Codes. After you set up the two-factor authentication for an account, accessing it the next time from your mobile device will likely require some attention. Google provides app-specific codes for your mobile devices to use, so that the built-in mail and calendar apps can continue to work with their services.

How Do I Do It?

I’m not going to step through the processes to enable two-factor security on your accounts. There are several excellent tutorials on the Web, so I will point you to perfection rather than create mediocrity.

Read the articles below and take the time to implement these security features.  They will step you through the processes for Microsoft, Google, Yahoo!, Facebook, DropBox, and LastPass.

Enable and Use Two-Step Authentication with Your Microsoft Account (Supersite for Windows)

How to Enable Two-Factor Authentication on Popular Sites (Cnet)

Best of luck to you!

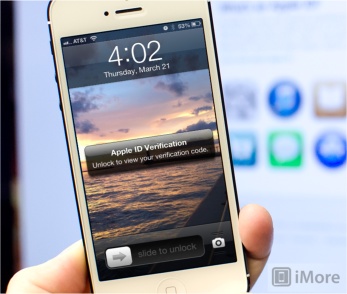
Enable Two-Factor Authentication for your Apple ID

Two Factor Confirmation on iPhone Lockscreen

This is important!

Your Apple ID isn’t just for your Contacts and Calendar in iCloud, it holds your personal and credit card information. It also allows purchasing content from iTunes. If someone with malicious intent gets your password changed, then you could be facing a lot of trouble and inconvenience.

Two-factor authentication offers real protection against this threat. It uses something you know (but that a thief can get) and something you have (most thieves won’t be able to get both). So please consider implementing this for your own Apple ID account.

Rather than create a mediocre guide, I’m linking to perfection. iMore offers a terrific step-by-step guide to implement this solid level of protection. iMore is a great resource for Apple rumors and tutorials.

Visit iMore*

* One important thing missing from the iMore guide is that Apple mandates a waiting period of 3 days to complete the process. This allows time for Apple to send messages to email addresses on your account. This is good just in case it’s not you implementing the Two-Step Verification.

Go Beyond Simple Passcode on iPhone

Advanced Numeric Passcode

If you wish you were able to have a five-, six-, or 20-digit numeric code to unlock your iPhone, then you’re in luck. With an innovative implementation of the alpha-numeric passcode, you can create a numeric passcode of any length.

Advanced Numeric Passcode

  1. Go to Settings/General/Passcode Lock.
  2. Turn on the Passcode Lock on if it isn’t already.
  3. Tap the toggle for Simple Passcode to Off. If you have an existing code, you will be asked to enter it.
  4. Tap the keyboard key in the lower left corner to toggle to the numeric/special characters keyboard.
  5. Use on the number keys to enter a numeric code, then tap Next.
  6. Re-enter the numeric code again (after you change to the numeric keyboard), then tap Done.

When you wake up your iPhone, your Passcode screen should look something like this.