On January 30, Google ended support for a Microsoft technology, Exchange ActiveSync, many Apple iPhone users employed to synchronize their phones with your Google Calendar and Contacts. New accounts and reset phones reconnecting to Google services must use a different connection technology.
This post will step you through the simple process of using CardDAV and CalDAV to sync with your Contacts and Calendar, respectively. One benefit of CalDAV over ActiveSync is support for calendar colors when your account is set up to view other calendars (like a friends, significant other, or group calendar).
The steps mention iPhone, but they will work for iPad and iPod touch.
Set up CardDAV for Google Contacts:

- Open the Settings app.
- Scroll down a bit and tap Mail, Contacts, Calendars.
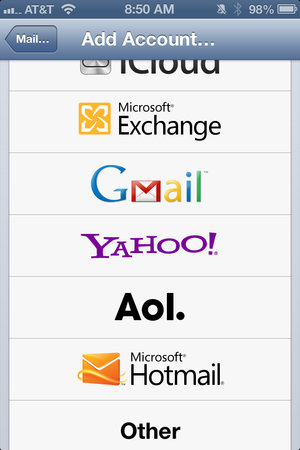
- Tap Add New Account…
- Tap Other.
- Under Contacts, tap Add CardDAVAccount.
- Fill in the form with the following information:
Server: google.com
Username: Your Google email address
Password: Your Google account password
Description: Enter a meaningful name for the account such as Google Contacts - Tap Next.
The iPhone should sync with the account and populate the iOS Contacts app with your Google Contacts.
Set up CalDAV for Google Calendar (if you did the CardDAV setup, this will be familiar):

- Open the Settings app.
- Scroll down a bit and tap Mail, Contacts, Calendars.
- Tap Add New Account…
- Tap Other.
- Under Calendars, tap Add CalDAV Account.
- Fill in the form with the following information:
Server: google.com
Username: Your Google email address
Password: Your Google account password
Description: Enter a meaningful name for the account such as Google Calendar - Tap Next.
The iPhone should sync with the account and populate the iOS Calendar with Google Calendar events.


